FITS
Manufactured parts are required to mate with one another during assembly. The relationship between the two mating parts that are to be assembled, that is, the hole and the shaft, with respect to the difference in their dimensions before assembly is called a fit. An ideal fit is required for proper functioning of the mating parts. Three basic types of fits can be identified, depending on the actual limits of the hole or shaft:
1. Clearance fit
2. Interference fit
3. Transition fit
Clearance fit
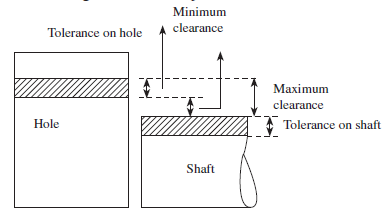
The largest permissible diameter of the shaft is smaller than the diameter of the smallest hole. This type of fit always provides clearance. Small clearances are provided for a precise fit that can easily be assembled without the assistance of tools. When relative motions are required, large clearances can be provided, for example, a shaft rotating in a bush. In case of clearance fit, the difference between the sizes is always positive. The clearance fit is described in Fig.
 |
| Clearance fit |
Interference fit
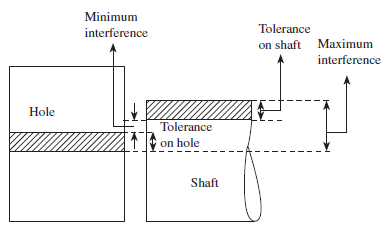
The minimum permissible diameter of the shaft exceeds the maximum allowable diameter of the hole. This type of fit always provides interference. Interference fit is a form of a tight fit. Tools are required for the precise assembly of two parts with an interference fit. When two mating parts are assembled with an interference fit, it will be an almost permanent assembly, that is, the parts will not come apart or move during use. To assemble the parts with interference, heating or cooling may be required. In an interference fit, the difference between the sizes is always negative. Interference fits are used when accurate location is of utmost importance and also where such location relative to another part is critical, for example, alignment of dowel pins. The interference fit is illustrated in Fig.
 |
| Interference fit |
Transition fit
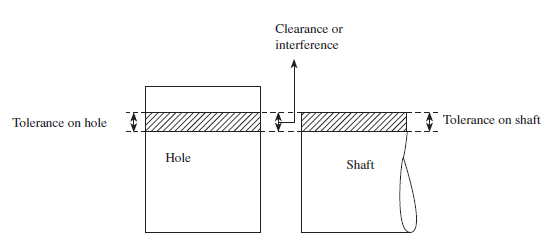
The diameter of thelargest permissible hole is greater than the diameter of the smallest shaft and the diameter of the smallest hole is smaller than the diameter of the largest shaft. In other words, the combination of maximum diameter of the shaft and minimum diameter of the hole results in an interference fit, while that of minimum diameter of the shaft and maximum diameter of the hole yields a clearance fit. Since the tolerance zones overlap, this type of fit may sometimes provide clearance and sometimes interference, as depicted in Fig.
 |
| Transition fit |
Precise assembly may be obtained with the assistance of tools, for example, dowel pins may be required in tooling to locate parts.
In a clearance fit, minimum clearance is the difference between minimum size of the hole, that is, low limit of the hole (LLH), and maximum size of the shaft, that is, high limit of the shaft (HLS), before assembly. In a transition or a clearance fit, maximum clearance is the arithmetical difference between the maximum size of the hole, that is, high limit of the hole (HLH), and the minimum size of the shaft, that is, low limit of the shaft (LLS), before assembly.
In an interference fit, minimum interference is the arithmetical difference between maximum size of the hole, that is, HLH, and minimum size of the shaft, that is, LLS, before assembly.
In a transition or an interference fit, it is the arithmetical difference between minimum size of the hole, that is, LLH, and maximum size of the shaft, that is, HLS, before assembly. Thus, in order to find out the type of fit, one needs to determine HLH − LLS and LLH − HLS. If both the differences are positive, the fit obtained is a clearance fit, and if negative, it is an interference fit. If one difference is positive and the other is negative, then it is a transition fit.
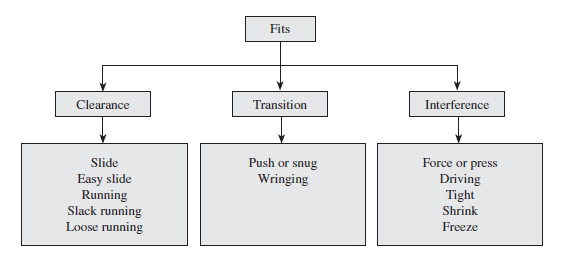
The three basic types of fits, clearance, transition, and interference, can be further classified, as shown in Fig.
Allowance
An allowance is the intentional difference between the maximum material limits, that is, LLH and HLS (minimum clearance or maximum interference) of the two mating parts. It is the prescribed difference between the dimensions of the mating parts to obtain the desired type of fit. Allowance may be positive or negative. Positive allowance indicates a clearance fit, and an interference fit is indicated by a negative allowance.
Allowance = LLH − HLS
Table gives examples of the classification of fits.
 |
| Detailed classification of fits |
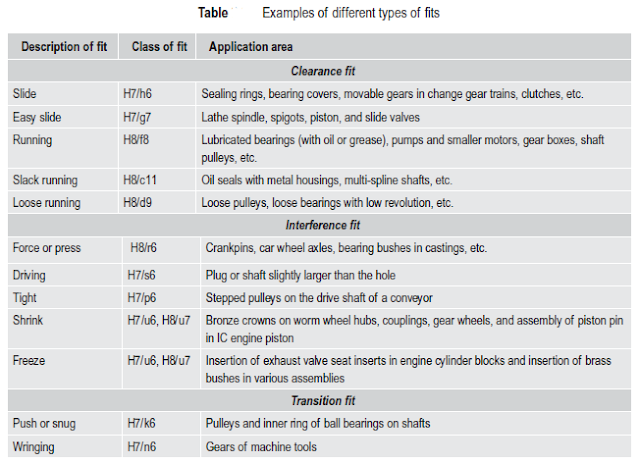 |
| Examples of different types of fits |
Hole Basis and Shaft Basis Systems
To obtain the desired class of fits, either the size of the hole or the size of the shaft must vary.
Two types of systems are used to represent the three basic types of fits, namely clearance, interference, and transition fits.
They are hole basis system and shaft basis system.
Although both systems are the same, hole basis system is generally preferred in view of the functional properties.
Hole Basis System
In this system, the size of the hole is kept constant and the shaft size is varied to give various types of fits. In a hole basis system, the fundamental deviation or lower deviation of the hole is zero, that is, the lower limit of the hole is the same as the basic size. The two limits of the shaft and the higher dimension of the hole are then varied to obtain the desired type of fit, as illustrated in Fig.
 |
| Hole basis system (a) Clearance fit (b) Transition fit (c) Interference fit |
This type of system is widely adopted in industries, as it is easier to manufacture shafts of varying sizes to the required tolerances. Standard size drills or reamers can be used to obtain a variety of fits by varying only the shaft limits, which leads to greater economy of production.
The shaft can be accurately produced to the required size by standard manufacturing processes, and standard-size plug gauges are used to check hole sizes accurately and conveniently.
Shaft Basis System
The system in which the dimension of the shaft is kept constant and the hole size is varied to obtain various types of fits is referred to as shaft basis system. In this system, the fundamental deviation or the upper deviation of the shaft is zero, that is, the HLH equals the basic size. The desired class of fits is obtained by varying the lower limit of the shaft and both limits of the hole, as shown in Fig.
 |
| Shaft basis system (a) Clearance fit (b) Transition fit (c) Interference fit |
This system is not preferred in industries, as it requires more number of standard-size tools such as reamers, broaches, and gauges, which increases manufacturing and inspection costs.
It is normally preferred where the hole dimension is dependent on the shaft dimension and is used in situations where the standard shaft determines the dimensions of the mating parts such as couplings, bearings, collars, gears, and bushings.
